This is a post that has been a long-time coming. Like an embarrassingly, long-time coming. As in, I bought the watercolors in the Fall of 2013, long-time coming. Okay, so now that that bit of information is off my chest...let's get to it.

A mix of darker and lighter hues to create subtle color variation 
Simple stripes
Playing with an ombre effect
Watercolors have been SUPER popular lately and I am in full favor of this trend. I love the minimalist, delicate feel that they give off. I think part of the reason that I avoided completing this project was because I am no artist. I might be crafting and maybe a little creative but I have almost zero artistic talent. Watercolors are hard to mess up though because you can easily dilute things with more water or make it darker with another coat. 

Looks like the Pantone Rose Quart and Serenity color of 2016 a little?
What you need:
Water color paper (on sale)
Watercolor set, I used this set and this set (on sale)
Paint brushes (both paint sets included a brush)
Gift tag punch (on sale)*
Bowl of water


1. Punch your cards. I punched as many as possible on a single 11x15 sheet because the paper is expensive. I got 19 tags per sheet.

2. Punch the holes in the top of each tag.

3. Paint your tags using whatever techniques strike you. I made this up as I went because like I said, I am no artist and this was honestly the first time I have used watercolors since like 3rd grade. 

4. Let the tags dry completely

Add to a gift right away or store with your other gift wrapping supplies. These are an easy way to get creative and personalize the gifts you give. They also make great labels!


*This tag punch is a little expensive at $29.99 but I got mine with a 60% off coupon. I also use it ALL THE TIME so it has been an investment that is totally worth it for me. I am anticipating that it will get even more use in upcoming wedding preparations! :)

Ravelry
Kollabora
Carter asked me to knit him a pouch to hold his bluetooth speaker on Christmas Eve. I knit this up in January and give him it for Valentine's Day. I was extremely impressed with myself for knitting this, weaving in the ends, and sewing on a button in less than a month after Carter asked for it. In reality, I finished the case over just a few hours one weekend. I am sharing it with you now, almost a month after making it because I wanted to get pictures of it with the speaker inside it and had to wait until Valentine's Day to do so


I was originally going to make a pattern up myself until I found this a free project on Ravelry that was a Yugioh card holder. I just modified it slightly to meet the dimensions of Carter's speaker. I was able to find the width, length, and height of the speaker really easily on Amazon. The speaker is awesome by the way!


Materials:
This is project was made entirely with recycled materials! A free project!
Worsted weight yarn - mine was recycled from a sweater
Button - from my button jar.
Needles: US 5 DPNs

Time Requirements: 2-4 hours while watching movies and drinking wine with the roomie.

Free Pattern by Samiha Qureshi


Ravelry
Kollabora

Yesterday, I blogged about this ribbed beer cozy that I made for Carter. Today I am going to share a second cozy that I made for him. It is another free pattern but this one uses sock weight yarn instead of worsted so it takes a little more time to make but the results are equally satisfying. I knit this one up while watching the Bengals vs. Steelers playoff game.  

I think I like this one slightly more than the other one because I really like how I lined up the self-striping sock yarn. I knit in a 2x2 rib for 1 inch at the top in black, then switched to the self-striping yarn for the body, and switched back to the black yarn for the base. I used up almost all of the self-striping yarn that I had leftover from some socks that I knit this past fall. 

Carter said he likes this cozy more than what I shared yesterday because it's more fitted to the bottle. However this is a thinner yarn so it is possibly less insulated?

Yarn requirements: Sock weight scraps
Needles: US 2 DPNs or 9" circular
Time requirement: 2 hours

Free pattern by Jessica Landers
Ravelry
Kollabora
As a last a last minute addition to Carter's Christmas gifts, I decided to knit him a ribbed beer cozy. It was a super simple project and helped me use up two little balls of stash yarn! Yay! 

I liked making him this because A) I used up yarn,  B) it was free,  C) I got to give him a homemade gift, and  D) he said he wanted one of these right after I started the project! 

I ran out of the red on the bottom so the base is gray yarn!

Yarn requirements: worsted weight scraps
Needles: US 6 DPNs
Time: 1-2 hours

Free Pattern by Siouxsie Stitches


Ravelry
Kollabora
I have always wanted to make Christmas gifts for my family but I had avoided it because I wasn't sure what they would think about it. I know that Carter loves hand knit things but I was nervous about how my family would react to handmade gifts. In late November, my sister asked me if I would knit her a hat. She showed me a color she wanted and I went in search of a hat pattern. I found the Bray Cap hat pattern by Brooklyn Tweed and ran it by my sister before casting on. 

About the pattern, it was only the second knitting pattern that I have actually purchased. Everything I have made besides this pattern and one other have been free. It was $7.00 which I guess it a little high price-wise but in the same ballpark range of a sewing pattern. I didn't mind buying the pattern because it was supporting people like me who like to knit but have gone a step further and made a career out of knitting. I also didn't mind dishing out some money for it because it was so pretty and having a pattern from a group like Brooklyn Tweed meant I would be using something easy to follow and well designed. I had zero stress when knitting this because their pattern was so straightforward. I even learned a few new techniques with the case on! 

I plan on making this hat again but for myself so I would highly recommend this pattern to anyone looking for a hat to make!

Pattern: Bray Cap by Brooklyn Tweed ($7.00 USD)
Yarn: Cascade 220 in Doeskin Heather
Needles: US 4, 5, and 8 DPNs

Modifications:
I knit the ribbed brim for 2.25" instead of 2.75". After finishing the hat, I decided that it was too slouchy. I asked my sister since she would be the one who was wearing it and she agreed so I ripped out about half the hat and omitted the third repetition of rows 6-13 in the pattern. This made the hat the perfect length.


Knit Gift Pouches
It's probably fairly obvious that I like knitting and the main reason that I sometimes blog here is to share my little DIY projects with you. If you know me personally, then you probably know that I am absolutely terrible at starting crafts and completing them before I start something else. I like working on things here or there but I am bad at finishing them. I've been trying to get better. Another thing you probably know if you've ever seen my craft area is that I have a lot of yarn. A lot. I blame thrifting and recycling sweaters. It happens a lot. I've also grabbed my fair share of thrifted balls of yarn. Often times no labeled so I have no idea what it is. I've gotten better at not buying this yarn because knowing the brand and components of the fiber is something I've taken to caring about more recently. I'm rambling now so I will get to the point.

Knit Gift Pouch
These little gift card pouches. A quick project using tiny amounts of various yarns in worsted weights. I like these because I can make them so fast, I don't have time to set them aside for a different project. Plus they are only holding gift cards so I don't need to know much about the yarn fiber. I don't have to worry about how they'd hold up in a washer because I don't think many people will be washing them. I know that these are going to hold up better than a cardboard gift card box too. I can give a gift card away in these and rest assured that it will probably be passed around next year to a new owner with a new loaded gift card. A gift that keeps on giving. :)

So like I said, these are a quick little project. You can use tiny bits of scrap yarn and a spare button and then pass along to family and friends (though they will probably prefer the gift card inside it.) These are a great last minute gift packing idea.

What you'll need:
Yarn used: scraps
Needles used: US 6
Button of your choice
tapestry needle, cable needle, scissors
My Hat
So...I started knitting this hat in May and then I finished it in October and now I am sharing it with you now in December. It wasn't that I didn't like this hat, it just seemed to be never ending. Maybe that's because I knit a row here or there and didn't really force myself to get it finished in a timely manner. Knitting in the summer for a winter object in a too small for you size really gives a girl zero motivation to get anything done.

About the pattern, this was Purl Soho's free Traveling Cables hat and it was lovely. The pattern was really straight-forward and easy to follow. I liked how the pattern had the cable pattern written out too instead of having to follow a chart. Plus they included some good pictures on how to do the cables which would be helpful if this was your first cable project.

I used Malabrigo Merino Worsted in Azul Buscando. I love this yarn. It's so soft and easy to knit with. Easily one of my favorite yarns.

It's been unseasonably warm here in Indiana but if you're looking for a cabled hat to try, you could give this a go. Plus if it's been warmer than usual where you're at, maybe this will be done by next winter if you finish projects as slowly as I do! :)
Carter and I have been dating for four years. FOUR! How is it possible that I am old enough to have been in a relationship with someone for four years? Craziness I tell you. Anyways, I love him and he is seriously the best.

One thing that is so great about Carter is that we have so much in common- both about big things and little things. For instance we both love to thrift and create. He has made me some awesome gifts over the years and I have made him some things as well. When we talk about our future we have agreed that we want to travel both in and out of the US. I started thinking about the places that we have been together and then a few months ago I saw this. I thought it was awesome and would be a cool way to see where we have been together as well a nice decor piece for our home someday. 

So this was linked to a tumblr page with nothing there but I have seen other pictures of this on Pinterest.

If you are not a sewer or don't have time to hand sew, you could easy paint in the states you've been to or use a fabric marker and color them in. This would go much faster, just make sure to color/paint on some newspaper or cardboard to prevent staining your work surface.

So where we have been*:
Indiana: Where we were both raised and met freshman year of high school in 2008.
Michigan: Our first vacation together with Carter's family in 2011. Not to mention trips to my family's cottage and then to Carter's parents' place in Northern Michigan
Florida: Spring break trip to my grandparent's house in 2012.
Ohio: Where we both go to college. 
Kentucky: Crossing the Ohio River into Newport and Bellevue to thrift and hang out On the Levy. Also a trip to Mammoth Caves.
Missouri: My cousin's wedding, 2014.

*I could have included more states but I felt like it would be cheating to include states that we only drove through or stopped for gas. I also wanted to include only states that we have both been to together. We have both been to Massachusetts, North Carolina, Illinois, and California but not at the same time.

What you'll need:
Fabric- I used linen fabric.
Embroidery hoop- keep in mind the smaller the hoop, the more cramped some states will be.
Embroidery floss/fabric paint/fabric marker
Sewing needle
Transfer pen- available at craft stores in the Embroidery section
Wax Paper

Steps:
Find a picture of the United States and insert it into a word document.
Under Format picture, select "Rotate" and then "Flip Horizontal so that your image is now backwards.

Print this to the size that you need to match your hoop. 

Cut your fabric in a square shape to fit in your embroidery hoop.

Optional: Hem/serge (or just use a zigzag stitch) around your edges to prevent fraying.

Prepare to transfer your map image to the paper. I used this link for help deciding how to transfer my image.
Some supplies
Basically what you do is tape wax paper over the image and then trace the image using your transfer pen. Once this is done, simply take the wax paper with the drawn on side placed facing the fabric and then run an iron over the wax paper so your image is transferred to the fabric like so:
Backwards tracing of the United States minus a few Great Lakes, Alaska, and Hawaii 
If you don't flip your image horizontally, when you iron the image to your fabric, your fabric will have display backwards.
I smeared by pen but it should wash out. I can't wash it until all the lines are filled though! 
Fill in your states either by sewing, painting, or coloring them in.

I found that sewing each state was actually very easy and quick. This project was almost zero cost too. All I needed to buy was the transfer pencils so I am quite pleased with my investment. Also Carter really liked this gift so that's a plus too. :)
Where we have been so far!


I took apart a thrifted sweater using the method I showed you how to do in this post: Making Yarn Sorta for this hat. I used this pattern from Wool and the Gang!

You will also need needles that will meet the pattern's gauge of 6 stitches per inch. This is IMPORTANT! My gauge matched but I think I was supposed to use two strands of the yarn because I ended up with an infant sized hat.

I was excited for this to match my cowl and boot cuffs so I may have to knit another one in the correct gauge to wear around. This was my first try at knitting a hat though so I was pleasantly happy with how easy it was to make. It would have been nice for it to fit on my head but I know a couple of babies whose moms may want a hand knit hat! :)

See my project on Ravelry!

Because my first adventure in cable knitting was such a success, I just couldn't help but go back for more! So here's another go using a different pattern. I'll have to say that I like this one even more! We just got a bunch of snow at school so I have been wearing this pair and people have been complimenting me left and right. They are even more impressed when I share that I made it myself. :)

This headband/ear-warmers looks great with your hair up or down!

Yarn used: Bernat Roving in Lichen

One skein was enough to knit two ear warmers too plus extra yarn!

Needle Size: US 11

This is bad lighting, the color of the yarn is true to the photo above.


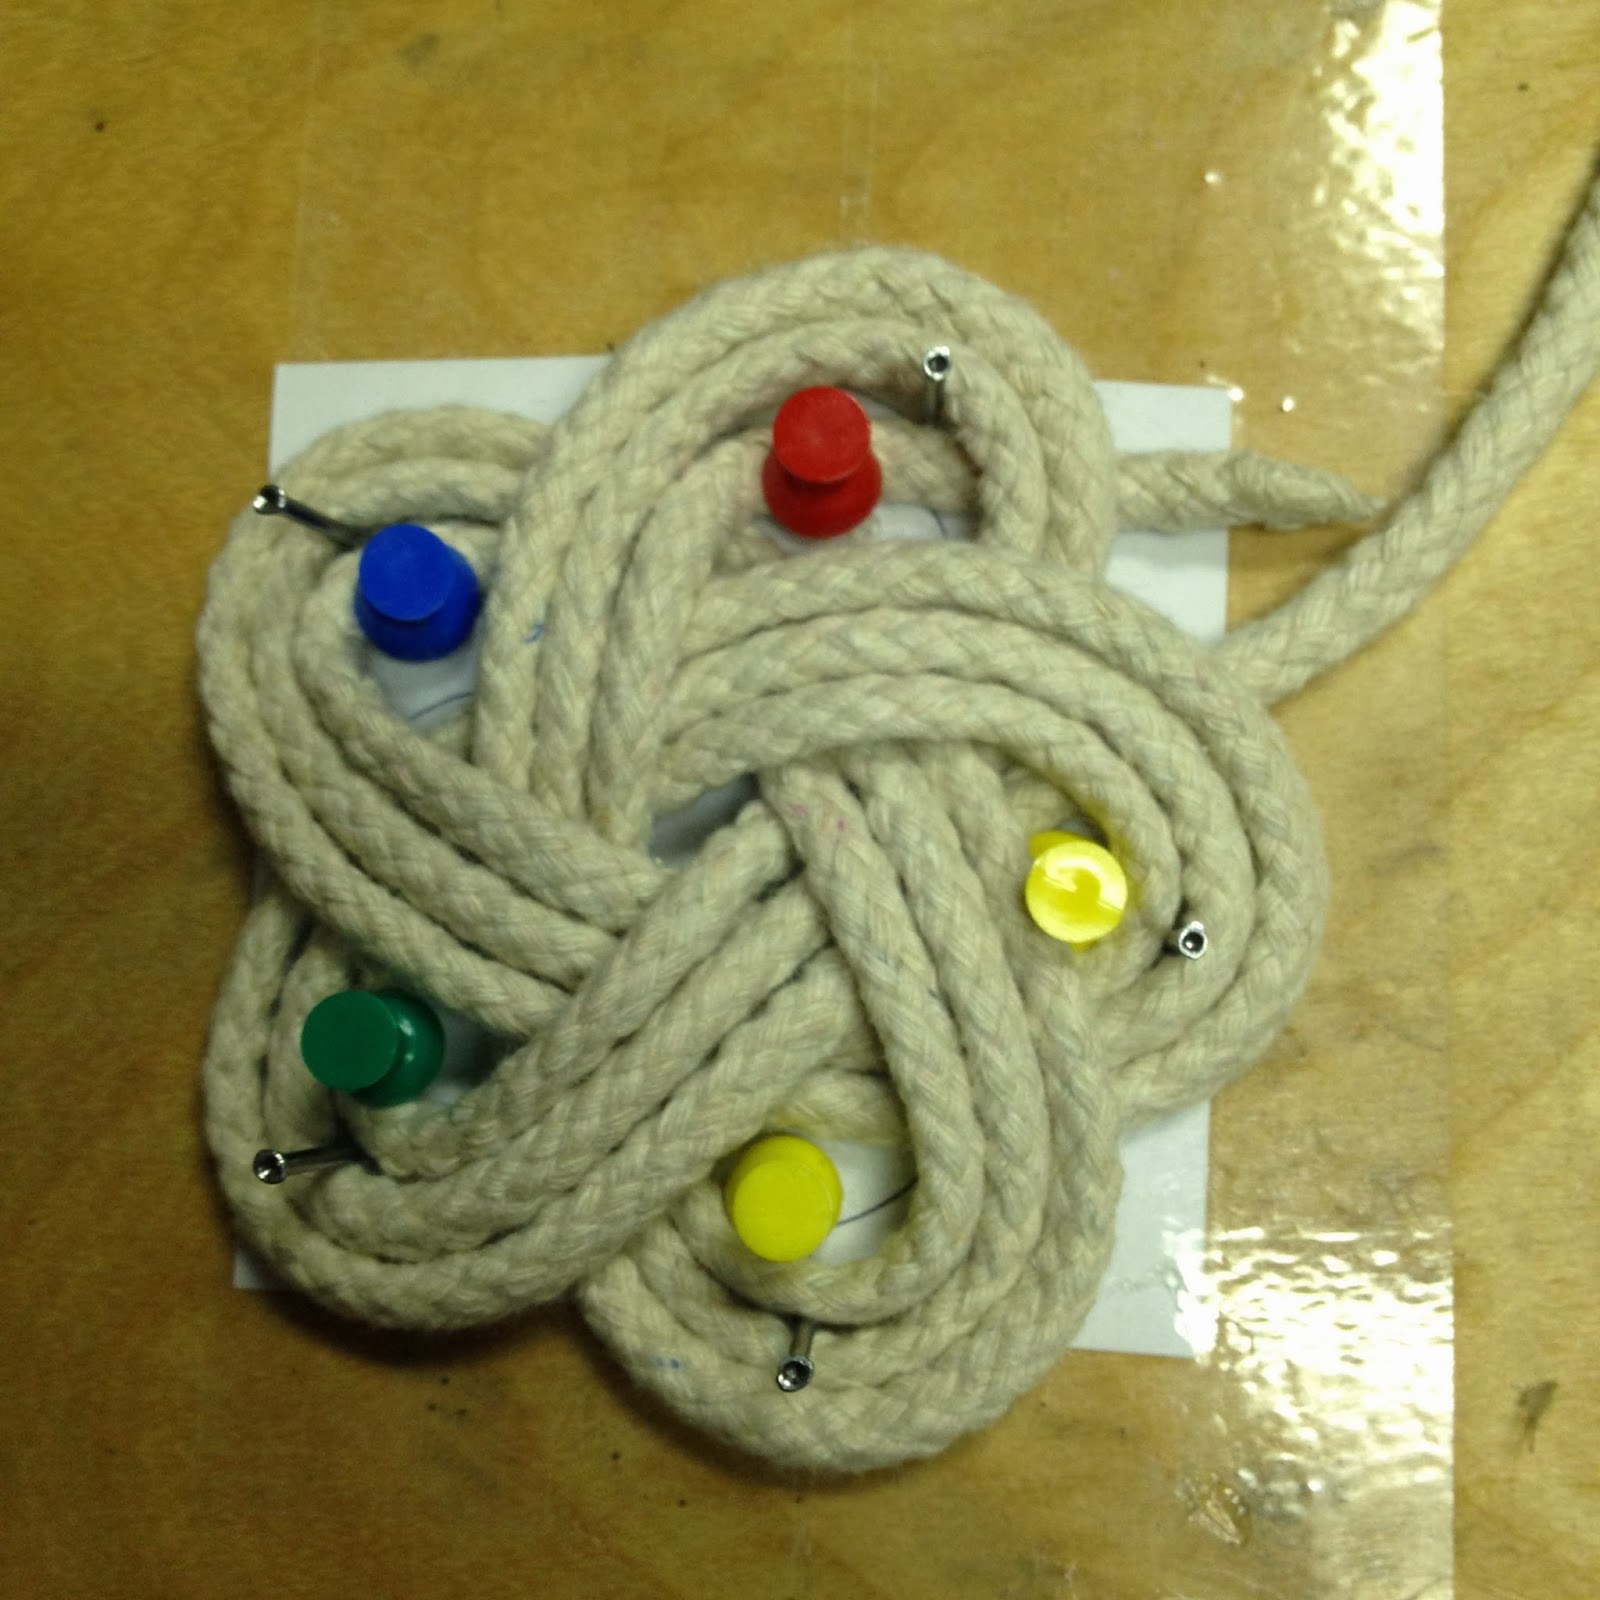
I found some nautical coasters that were pretty expensive. You can find them all over Etsy but by looking at them, you can tell they would be a fairly easy DIY project. 

I had some cotton rope that I had gotten awhile ago planning to use it for a sew rope basket (that failed.)  So I was glad to do this to use it up. I think I purchased the rope for $1 at our local Habitat for Humanity store. If you've never checked them out before you totally should for your next home project! 

I made these for a Christmas gift for Carter's parents to use at their new cottage. I put them on these homemade spools that had all these crochet coasters that I had got at Salvation army. I got about 40 coasters and ten spools for around 50 cents total.

That makes this a 1.50 project for 15 coasters (I used the whole thing of rope.) That means it was about 10 cents a coaster!

What you'll need:
Rope (I used cotton)
Glue gun
Nail/hammer
Piece of scrap wood
Tape
Thumbtacks

PREP WORK

1. Print off this diagram of a Larks Head Knot in the size you want your coaster to be.
Print me off :)

2. Cut it out and tape it to the scrap piece of wood. I just free handed mine because my printer was being stubborn.

3. Hammer a nail at the outside of each loop.
Try to place the nail near the center of the loop.
4. Place a thumbtack (or another nail) into the inside of each loop.


MAKING A COASTER

1. Cut a piece of rope roughly 4 feet long. The amount of rope you will use will depend on your rope thickness and how many rounds you do. I suggest you try making a coaster before cutting a piece of rope off, then cut this and use this piece as a guide for how long to cut your other coasters.

2. Place a small about of hot glue at each end to prevent fray. This will also make weaving the rope much easier.

3. Begin by placing the rope with a 2 inch tail between on of the nails and thumbtacks. Then follow your Turks Head diagram to see if your rope should go over or under the other loops it crosses. Create your first round making sure the rope goes between all the nails and their matching thumbtacks.

4. Repeat step 3, this time making your loops directly outside your nails. 

5. Repeat step 3 again, this time placing your rope directly next to the second loop.

6. As you can see your coaster/trivet looks a little sloppy and loose. Pull the rope starting at the beginning of the first round. Continue pulling until the trivet is tighter and all the extra rope that had been making the coaster loose is at the end. (I know that is confusing but hopefully it makes sense!)


7. So since the tail is under some other loops, with the hot glue gun, place some glue under the loops to secure the tail in place. Then cut off the excess rope. 

8. Remove the thumbtacks and glue the beginning excess rope in place so it looks like the trivet is a continuous piece. Then glue each loop in place to the loop under it. This way your piece will keep its nice flower shape and won't look wonky. 


I also found this tutorial on making Turks Head knot coasters. They make their a little differently but still gets the same look. Just gotta do whatever is easiest for you! :)


Seriously, these are the best caramels ever. If you make these, everyone will love you and want to be your best friend, if only in hopes that you will give them more of these treats! They are simply addicting. The recipe is pretty straight forward but it will take anywhere from an hour to and hour and half based on your oven. The key part to making caramels is watching your candy thermometer. If you cook them too long then the caramels will be hard like Werther's, they will taste good but not soft and chewy. If you don't cook them long enough the carmel will cool and have a grainy texture because the sugar didn't reach a high enough point. 


Ingredients:
1 cup butter, plus a partial stick 
4 cups half and half
4 cups sugar
11/2 cups Karo light corn syrup

Additional stuff:
Wax paper/Candy wrappers
Large Pot
Knife
9x13 Glass Pyrex
Candy Thermometer


 How to:
1. With the partial stick of butter, great the bottom and sides of your Pyrex pan. If you skip this, the caramels will not come out easily at all. This works best of the stick of butter is refrigerated. 

2. Combine butter, sugar, light corn syrup, and 2 cups of the half and half in the pot.

3. Heat on high constantly stirring. 

4. Once simmering, add the remaining half and half.

5. Stir constantly until your thermometer reaches 242 degrees. 

6. Pour immediately into your greased 9x13 Pyrex.

7. Allow to cool and fill your pot with water to help remove caramel residue.

8. If using wax paper instead of candy wrappers, being cutting into squares. We do 3 squares per row.

9. Once cooled, cut the caramel into rows and then into squares. 

10. Wrap up with paper. This will turn them into a tubed shape piece of caramel.

ENJOY :)

This will make a TON of caramel

Look at me on Kollabora!

It's getting cold here but friendship bracelets can add a little bit of summer to your outfit even in the winter months. They are a snap to make and look so much more fancy than they really are. 

See the fishes?
All you need is three colors of embroidery floss. I also like to use buttons to finish off bracelets but you can just as easily secure the bracelet with some knots too.

How to:

REMEMBER WHEN MAKING FRIENDSHIP BRACELETS YOU ALWAYS USE DOUBLE KNOTS!!!!

I made this pattern on on this site which is a great place to find friendship bracelet patterns and tutorials. You can also generate you on patterns on the site and it's free!
On row 23, the first knot should be a backwards black knot, NOT A FORWARDS  GREEN KNOT!


I made this pattern but it would not allow me to modify this so, I actually started on the second green fish again after the two rows of blue stripes after the first blue fish. If you look at the flat picture of my whole bracelet, this might make more sense.

What the arrows mean:
The Left Diagonal: FORWARD KNOT
The Right Diagonal: BACKWARDS KNOT
The Left then Right: FORWARD BACKWARDS KNOT
The Right then Left: BACKWARDS FORWARDS KNOT

Arrows explained:
Here's a great video explaining the 4 basic friendship bracelet knots that are used in this pattern and all friendship bracelet patterns by FrootLoopable
This was a fast bracelet a made over the summer using up some extra beads and leather cord. It took about 30 minutes to make and it's adjustable in length. 

You can check out how to make it here on my Kollabora page!


See my cowl here
I love Ravelry! It has been a wonderful resource for me as a knitter. It's free to be a member and gives you access to hundreds thousands of free patterns for both knitting and crocheting.  There are also patterns available for purchase. You can search for them on the site too! You can also stash your yarn and needles on the site so you can view your inventory online.

 What I love most though is you can queued things so you can go back and knit them later. You also have a projects portfolio where you can add pictures and notes in case you modified a pattern you used. You can also create your own patterns for others to use or purchase. 

In the patterns, you can also view yarn ideas where you can see what yarns have been used by other knitters and how many times. You can also view pictures to see if you like how that type of yarn knit up for the pattern. This is great for me because so many patterns call for super expensive yarn that I can't afford at this point in my life. (Cough cough, gorgeous Purl Bee patterns.)

One of the patterns I had queued was the Drop Stitch Cowl. It only took me about two hours to finish and was so easy to follow. What I loved is that it is knit in the round so it is seamless and you only have to weave in the ends! It also called for a bulky yarn and big needles so it knit up super fast. I love one skein projects!

Find the how to HERE!

What you'll need:
A Stitch Marker
Size 15  20 inch circular needles 
One skein bulky yarn- I used Lion Brand Wool Ease Thick and Quick in Lemongrass
An hour or two


Awhile back I order some tiny little glass vials on eBay for a project I have yet to get around to. Strangely the seller sent me some studs. I sat around with the studs and tried to come up with some clever idea but couldn't. Eventually I came up with these. They are easy and fun and you can get the suede cord in any color. There is real leather suede and vegan suede so this is also a great alternative for vegans. 

I have this cord in black, olive green, camel, dark brown, light blue, burnt orange, and purple, but there are so many other color options out there!

You can see these bracelets here on Kollabora.


I made ear warmers last winter. It knit up really quickly and was an overall easy project. It used less than half a of skein of yarn so can't complain there. They are great to wear in the winter and are totally in style too! You can also check this out on Kollabora here or on Ravelry here!

I modified this pattern for my ear warmers:


What you will need:
Size 10 Knitting Needles
1 Skein Lion Brand Wool-Ease Thick and Quick (Mine was in Charcoal)

A Brief Rundown:
This project is knit in a berry stitch (Row 1: K1, P1, repeat; Row 2: P1, K1, repeat.)
Since my yarn was thicker, I only used 1 strand vs the two used in the pattern.
At the end, I knit a small piece in the berry stitch instead of wrapping yarn around the seam. I made a button hole and used a button for closure to make it pop!

For my seam coverer:
CAST ON 6
Row 1: K1, P1, REPEAT
Row 2: P1, K1, REPEAT
Repeat Rows 1 and 2 until the piece is nearly long enough to cover your seam.
(REMEMBER: you want it scrunched, keep this in mind when you measure!)
Row 3: K1, P1, K1, YO, P1, K1, P1
ROW 4: P1, K1, P1, K1, K1, P1, K1
(Yes, I realize this throws off the berry stitch a bit.
ROW 5: CAST OFF

Pre-assembly