I have something to admit. I am a bit of a leather snob. When it comes to what's on my feet or what I am carrying on my shoulder, I won't buy it unless it's leather. No man-made materials for me. Sure a man-made vegan leather might not scratch as easily as an animal's hide but you are also losing the classic, real-leather feel. I love that feel. Cleaning up stains on fake leather is also a much easier process but I am willing to put in a little extra time to cleaning up spots for my real leather goods.

Real leather isn't cheap which is why when I am investing in a product, I try to make sure that I will be able to take proper care of it and do my best to make it last a little longer and look a little better. Leather naturally softens and scratches with age and that's fine but I don't want to have stains all over my stuff. This can be tricky when looking for leather goods secondhand. As you may should know, I am all about a good bargain and do the majority of my shopping secondhand. I am going to share a little secret on a place where I will go to look for clothes, shoes, and accessories from time to time.

ShopGoodwill is Goodwill's free, online, auction site. They have everything from home decor, clothes, shoes, jewelry, and furniture up for sale on this site. It can be a little tricky to dig through because you cannot filter your original search like you can on other auction sites like eBay. So you do have to do a little digging through various sizes, prices, and the like but you can get some really good deals on here. If you haven't checked it out already, I encourage you do so! Tip: click the shipping and handling estimate before you bid. Sometimes their shipping and handling prices are a bit high and it's good to know that before you win an auction. Like eBay, there is proxy bidding; you can put a maximum bid in but it won't go up to that amount until someone else bids it up that high. You can read more about bidding here.
So anyways, I won this Dooney & Bourke Florentine Bag for less than a third of its retail price. It's still a current product! I love the three pockets and my small Fossil cross body that I got in high school started to tear. I wanted another small bag that is good for going out or on days that I don't need to carry around much. This bag was an ideal choice. It is in stellar condition for a used bag besides a two super small stains on the front. There inside is spotless which was an added bonus.

What you'll need:
- Bar of Dove Soap
- Microfiber cloth

Directions:
-Dampen cloth and rub with soap
-Gently rub the purse with the cloth. Your purse will look worse at this point because it's wet. 
- Let dry and assess how the bag looks. At this point for me, some of the polish had been removed when I washed it but the stain was gone. 

- Apply a leather oil to the spot. After doing this, the spot that was stained and then lighter was now the same color as the rest of the bag.


Source: Ask Anna
Do you using the Pinterest's Secret Board Feature? I gotta admit that I have a bunch of secret boards going on right now. I have my original, Pin Now, Look Later board for things I want to read and look into but don't necessarily want to try, and of course there are like ten different wedding boards going on to keep some wedding stuff a surprise for the guests. Then I have a few To Do boards that include pins from my non-secret boards that I have been wanting to try. I have one general To Do board and then a more immediate To Do board with pins that I have all the supplies for on hand already. I currently have my immediate To Do named as Summer 2k16 because they are things that I want to do this summer. It's currently got 24 projects (including this one I am sharing now) that I hope to complete this summer. So its gone from 24 to 23 now that this is live! I was pretty happy that I finished one of the projects before I even went home for summer. 
This project uses the traditional friendship bracelet macramé knots. I think that you could easily make a few of these for your best friends and they would appreciate it just much as a bracelet. Just my thoughts!

I was hoping to make this project as a bracelet and not a keychain but I had some scrap embroidery floss down at school. I liked the colors but I knew it would not be enough to complete a full size bracelet, even for my tiny wrists so I decided I would still try out the pattern and complete it as a keychain. This is probably the longest pattern repetition that I have done with a friendship bracelet at 48 rows but the pattern was super easy to remember so I was able to complete this while watching some TV. I am not one to misplace my keys but I would like to think that if I do, the bright colors in this keychain might make it slightly easier to find. I wouldn't mind revisiting this pattern to make myself a bracelet too. 
You can check this project out on Kollabora too!
I've shared a few other friendship bracelets such as this one and this one. I may not make friendship bracelets as often as I used to but I still enjoy making them when taking a break from whatever is sitting on my knitting needles. I think the majority of my friendship bracelet making comes when it starts to get warmer out because there's something about these that is just so quintessentially summer for me. I don't know if it's the bright colors or fond summer camp memories but I think it might be a little bit of both for me. 

Time Requirements: Approximately 1 hour

Supplies
- 6 strands of embroidery floss approximately 40 inches long
- Scissors
- Keyring

For my keychain:
- Color A: Blue
- Color B: Pink
- Color C: Light Green
- Color D: Purple
- Color E: Dark Green
- Color F: Orange


Directions:
- Form a loop using the method shown in my braided bookmark tutorial. I made the loop very small as it's only holding a keyring.
- Using the pattern* below work Rows 1 through 48 one time
- Repeat rows 1-6 once more but do not do the side parts using colors B and D
- Tie a knot and cut excess string leaving a half inch tail
- Attach a keyring and key
Source


Summer Project list: 1 down, 23 to go

*Please note that I did not make this pattern. It is a free pattern offered friendship-bracelets.net

Applying to grad school is no small feat. During the application process, I was able to reflect on the past four years of my college education. In hindsight, I recognized areas that I wish I could have improved but I also got to remember so many wonderful, positive experiences.

My favorite highlight of my undergraduate time: organizing a drive for a local orphanage. As community service chair for the student organization I was involved with, I reached out to St. Joseph Orphanage in Cincinnati to see if there were any items that they were in need of. I was nervous because I was not sure what my peers and faculty would donate. It was so humbling to see the outpouring of donations for these kiddos. We were able to give the orphanage over $800 worth of toys, clothing, hygiene products, and school supplies. We also gave them duffel bags so that the kids would have something besides a plastic grocery bag to take their belongings to when they were placed with a family. This experience was made even more fulfilling when the orphanage director told us that without the generosity of my peers and faculty, the kids would not have had anything to open in that holiday season as their corporate donor decided to go in a different direction for their holiday philanthropy.

I have been a strong student throughout my entire education and for this reason, I was fortunate to be in a position where it was note a matter of if I would get into a program but where I would want to go. For this reason, I chose to apply to three schools whereas I knew of other classmates who were applying to 10-12 schools. Not only did this save me a lot of time and stress during my applications but I literally saved thousands of dollars.

Another thing that was to my advantage during this process was the fact that I have always been someone that has enjoyed actively participating in organizations and other events. Throughout college I have held an executive position on four different student organization boards.

Keeping my GPA, involvement, and GRE scores in mind, I decided on applying to the Indiana University (IU,) the University of Cincinnati (UC,) and Vanderbilt University. I had a strong feeling that I would be offered admissions to IU and UC due to their ranking and where I stood as an applicant. As far as Vanderbilt goes, I knew I would be competitive but I didn't know where I stood because they have the #1 Audiology program in the country.

I had my applications to IU and UC submitted before the new year. I got engaged January 10th and was still wrapping up my Vanderbilt application. At this point, Carter and I discussed if I should still submit my application. Carter has been so supportive throughout my schooling and has never wanted to get in the way of my education so he said I needed to apply still so I submitted my application to Vanderbilt a day before the deadline.

I heard back from UC first in the middle of February. Next was IU at the start of March. Finally Vanderbilt in the middle of March. I can happily say that I was offered admissions to all three programs but this also meant that I had a big decision to make. I weighed out my personal pros and cons of each program to decide which school would be the best fit for me. I crossed IU off my list first. Now between UC and Vanderbilt, I started to get really stressed. I loved UC and had spent an enjoyable 3 years as a Bearcat, I knew the area, I knew the faculty and they knew me, and it has amazing clinical opportunities. Vanderbilt had been my motivation and aspiration since my freshman year when I started to look into various programs throughout the country. It's hard to deny anything that comes from a program as respected as theirs (besides maybe the price of private tuition) and Nashville is an incredible city. I was torn. Turn down a school I love and know for a school unknown in a city I have only stopped in once? Or start life as a grad student in a new city? I really couldn't see any regrets either way.

In the end it came down to this:
After spending the past four years in the same city for a few months and then apart for a few months, Carter and I are so beyond ready to be in the same city. Carter didn't want to add any opinions to my decision so I had to decide where I wanted to go to school all on my own. We are so excited to start our life together as a married couple and going to Vanderbilt would have meant starting out our marriage apart for six months. Going to Vanderbilt also would have meant more student loans because the amount of aid I was offered didn't make it comparable to UC in price plus the cost of rent in Nashville is much higher than the cost of rent in Cincinnati. 

Turning down Vanderbilt was hard. Was it the hardest thing I have ever done in my life? No, but it was saying goodbye and thank you to the biggest motivator and possibility of what if that had lived in the back of my mind for the past four years. As sad as I was to say no to Vandy, the excitement of my marriage and all the good things to come at UC prevailed. 

I know that I am going to get a fantastic education at UC, I have experience nothing by support and kindness my faculty already, and I cannot wait to meet my classmates in August! 

#Bearcat4Life
Being a student can leave my schedule pretty booked sometimes and it can be hard to find the time to cook a meal that requires a lot of prep and bake time. I truly enjoy cooking meals but I won't say no to a quick and easy dish that tastes delicious either. These pizzas only take a few minutes to assemble because you don't have to make dough and let it rise. Carter is the dough master in our relationship so while he's on co-op, I usually don't eat pizza because I don't like taking the time to mix up a dough. Not to mention, that I don't want to eat a whole pizza by myself. Another bonus of this recipe is that you can make it for your whole family using the whole loaf or just use a small section to make pizza for yourself.

Did I mention how amazing the bread gets when it's baked. So crunchy and perfect!

Ingredients
- Baguette or French bread loaf
- pizza sauce
- mozzarella cheese
- parmesan cheese
- pepperonis or pizza toppings of choice

Directions
- Preheat oven to 400 degrees
- If you are not going to use the entire loaf, cut a slice of bread half the length that you want to use. (I like to cut a piece of bread that is about 3-4 inches long for myself.)
- Cut your loaf of bread in half long ways. (So now you have two 3-4 inch pizzas.)
- Spoon a generous amount of pizza sauce on each half of the bread. Add more than you would normally use because you want some to absorb into the bread
- Top with mozzarella cheese
- Add pepperonis or pizza toppings of choice
- Sprinkle with parmesan.
- Bake in the oven for 15 minutes or until cheese is melted and golden

There are few things better in life than a quick project that is done in under 10 minutes using supplies that you probably already have on hand. You don't need to plan a trip to the craft store and you get some satisfaction for using up some things that you already have on hand. These are the types of DIYs that really make me smile.


I have a few other bookmarks that I am planning on DIYing but I wanted to make these first because of how quick they would be to make. I don't have a bookmark, instead I usually mark my place in books with scrap pieces of paper. I can't say that I will use this over scrap paper every time but I like how colorful this is when marking my place to read.

You can check this project out on Kollabora too!
Supplies
- an old envelope
- washi tape
- scissors, pencil, ruler

Directions
- With your ruler, measure diagonally across one of the bottom corners of the envelope and mark with a pencil. (You will be able to make two bookmarks from a single envelope.) This step is optional but I wanted nice a nice 45-45-90 degree triangle for mine. The short sides of my triangle are 3 inches and the long side is 4.25 inches.
- Cut across your marked line. Repeat for the other corner. Recycle the rest of the envelope.
- Cover one side of the envelope with washi tape. Trim off the parts that overlap on the sides. The nice thing about the washi tape is how easy it is to peel off if you don't get it down straight the first time.
- Repeat on the other side of the triangle.
- Repeat the last two steps for your other triangle.


Source: Zakka Life


I am a college student. I am graduating at the end of the month and then I am going on to grad school (more on that in a future post.) Renting and having moved into a different place every year leaves very little desire to try and buy/make pieces customized to the space where I am at nor do I want to invest in any high dollar items. Today I want to share some of my favorite tips for decorating on a budget.

Check Craigslist out
I got this IKEA Alvine Ruta rug for $75 on Craigslist and it has held up wonderfully. I need to wash it but that won't be any time soon. My used price is much better than the brand new price of $249. I like the pattern and the fact that the rug is 100% wool.

Check your apartment building's trash area
Whenever a neighbor moves in or out of their unit, there is a good chance they will be tossing something. Carter snatched up a fan which he was excited about and I got this rug. Completely FREE!


Garage Sales
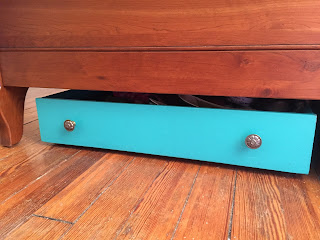
I made these underbed storage drawers using garage sale drawers. I paid 40 cents per drawer.
DIY underbed storage
I also bought my printer with scanner and copier at a garage sale for $10.00. The couple was mailed a new one from HP after this one "stopped working" after they returned from their winter home in Florida but I have had zero problems.


Check out your local thrift shops
I have found some pretty awesome little knick knacks. I love my two metal tins. The smaller holds matches, gum, and laundry coins while the larger holds headbands and hair accessories. I have also bought a lot of other great things secondhand. 


See what your family is not longer using and planning on tossing
I have gotten a lot of things this way. A dining table from my grandparents, a few carts, and my favorite: my beloved ceramic owls. All free!


See what you can borrow from family
Chances are if someone will let you borrow something because it also means they don't need to deal with storing it. I have been able to use Carter's mom's childhood desk from her parent's home. It's an adorable midcentury piece that is the perfect size for my space. It has two awesome little drawer spaces - one where I can hold my books and another for my pens. Again this is free!


Ask for things you need for your birthday/Christmas
My dresser was a gift that was actually purchased on Craigslist but I love the antique style.


See what you can DIY
Maybe some thumbacks or magnets?


I have long been a thrift store fan and later branched out to shopping at resale and consignment shops that sell more current and modern stuff. You can see my original comparison of thrift shops and consignment/resale stores here. I would estimate that I still shop at thrift stores 90% of the time that I am shopping secondhand.

A few years after beginning my thrift shopping addiction lifestyle, I decided to try out taking some stuff to a resale store. I have done Clothes Mentor and Plato's Closet (both locations in Fort Wayne, IN.) I am beyond Plato's Closet now because I don't own anymore junior brands. I never bought anything at Plato's Closet and I have made purchases at Clothes Mentor twice but I was shopping at a consignment shop, The Snooty Fox -that name I know-, in Cincinnati with good luck. The have a large selection of brands I love at good prices and a large 1/2 off sale section. With my luck shopping there, I finally decided to test my luck at consigning.

Due to the fact that I do almost all of my shopping secondhand at Goodwills, I was able to break even on just about everything that I had consigned which I was pretty excited about.  I can even say that some of the things I brought in provided me with even more than I paid for them. I am not in the business of exploiting charity thrift stores though so I would never shop specifically for items I could turn around and resale. That's not my end game and for me, it's not worth the time or gamble of possibly losing money.

I would say after my experience from both shopping and selling at the stores, I prefer taking my old stuff to a consignment shop. It is nice to know I can reuse someone else's old clothing and then when I ready for a change, I can consign/resale/donate it back and continue the cycle. It makes me and Mother Nature happy.

I am by no means an expert with consignment shops and resale stores but I am hoping to share what I have learned from my own personal experiences. Each store and location if it's a national chain will of course have its own variances but here's what I can say from my own experiences:

Consignment Shops
Pros
- You will get more money for your items. The store I take my clothes to gives you 1/2 of whatever they sell it for. So nicer brands = more money for you.
- The store takes what they want right what you walk in, tell you what they'd take in it's respective season i.e. fall/winter, and tell you what they think you would be best off donating.
- They are less selective on choosing items based on the year it came out. It doesn't matter if your shirt is from 2010 or 2016 as long as it is still in style and in good/excellent condition

Cons
- You are paid on commission so you don't get any money up front. So you do need to go back to the store and pick up what you earned. The store I go to says that you need to pick up any commission within 18 months. So yeah, not really a problem at all.
- Items may not sell and if that's the case you get no money. Unsold items are donated to charities so you can come and pick up a tax exemption card.
- I have successfully sold things that resale stores rejected at a consignment shop!


Resale Stores
Pros
- You get your money right away and don't need to check back to see if items sell or not.
- Branching off the above, if your clothing doesn't sell, it doesn't matter because you still got paid.
- These stores might be better at taking your out of season clothing.
- This is a little easier to bring items that you are on the fence about. You can hear how much the shop is willing to offer yo for the item and decide if you'd rather have the clothing article or the cash.

Cons
- Less money. They usually only off a few dollars per item unless it's an expensive, designer thing.
- More selective about dates on the tags. If any of your clothes are more that two years old, a resale store might not take it.
- You need to drop your clothes off and come back in a few hours or the next day after they have sorted through all your stuff. This balances out the whole paid up front thing.


Tips regardless of whatever you decide to do:
- Do a little research on the shop. Have you shopped there with luck and had a pleasant experience in the store? Does the store have any rules or guidelines for what they want on their website?
- Wash any clothes that you have worn and put back into your closet before taking them to a store.
- I like to iron just about everything because I want my clothes to look as appealing and in their best state.
- Fold your clothes or hang them on hangers to keep them in tip-top shape going to the store.
- If you decide all this getting money for your old clothes is too much work or not worth the effort, donate them to a local thrift shop instead and be sure to get a tax exemption donation form. You still get some money that way!